Wednesday 28 September 2011

How to Make a Miniature Clown

Materials to make a 1:12 scale clown
Just what every dolls house nursery or miniature toy shop needs! To make the mini clown in 1:12 scale assemble:
  • 1 wooden bead  (head)                  
  • 28 small felt circles (arms and legs)                           
  • 8 large felt circles  (body)                            
  • 4 small beads                                                 
  • 4 lengths of cotton thread (18 inches)
  • 1 piece of bunka
  • Coloured paper (hat)
  • Tiny pompom
I use a beading needle as it's long and flexible and the right size to slip through the beads. I make the small felt circles with a stationery hole punch and cut the larger felt circles with curved nail scissors.

1. To make one arm: take one length of cotton, thread the needle and run the needle through the centers of 6 small felt circles. Pull the cotton through and push the circles to the middle of the length of cotton. Thread through one bead then back through the centers of the circles. You should have a stack of circles with the bead at one end and the 2 ends of cotton coming out the same circle at the other end. Put aside.
2. Make the other arm.
3. To make the legs: do the same as for the arms but this time use 8 small felt circles.
4. Thread both ends of cotton of one leg through 8 large felt circles (the body) and up through the wooden bead head. Repeat with the other leg.
5. Thread both ends of cotton of one arm up through the top large felt circle and up through the head. Repeat with the other arm.
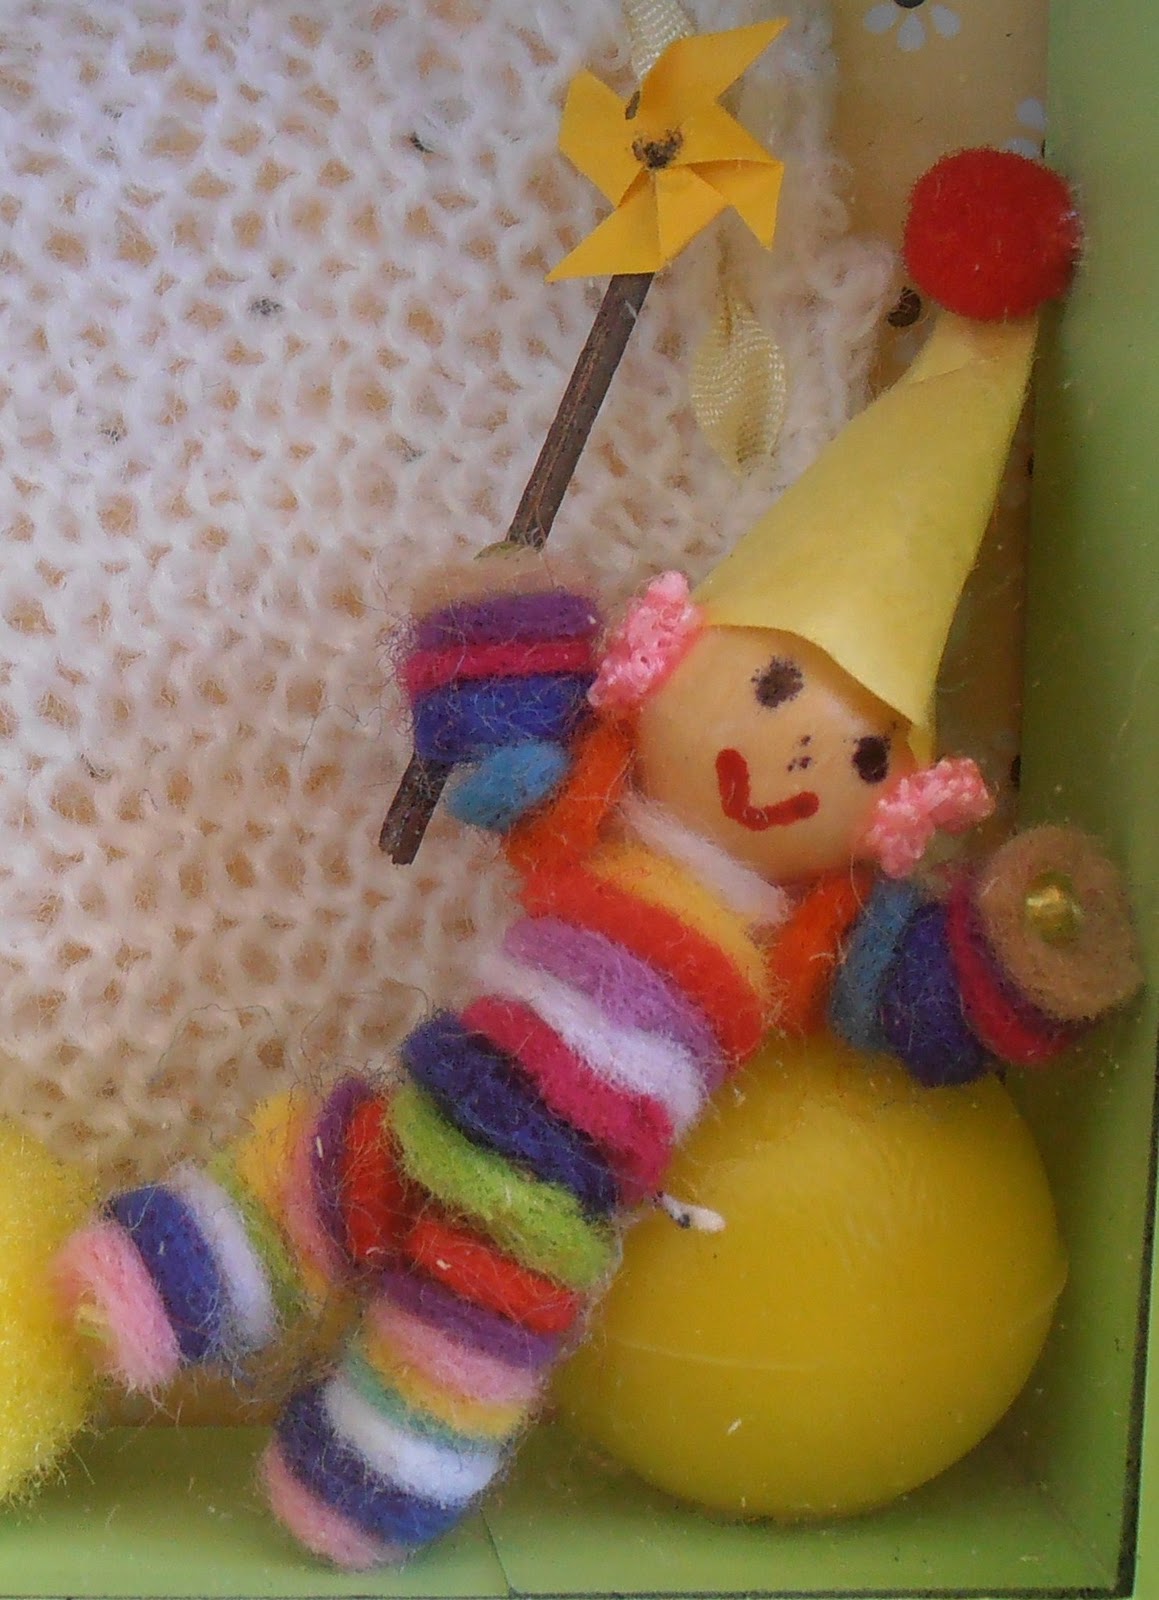
A miniature felt clown
6. Tie the 8 ends of cotton together in a knot close to the top of the head. Put a dab of glue on the knot to stick it to the bead. Leave to dry.
7. To make the hair: take the colourful length of bunka, pull the threads at one end to unravel it so it goes all curly. Cut it into short lengths.
8. Cover the sides and back of the head bead with UHU glue. Use a toothpick to help you push the short pieces of bunka onto the bead. Cut off the pieces of cotton close to the bead and stick bunka over the top. Leave to dry.
9. To make the hat: roll a piece of coloured paper into a cone and glue to head. Glue a pompom on top.
10. Mark eyes and mouth on the face with the felt tips.

There you have it - a mini clown!

Saturday 24 September 2011

Making a Shadow Box for a Baby: a Cute Present!

A miniature shadow box
Sometimes when you are in the middle of a big dolls house project, it's fun to take a break and make something that is quick to finish and is completely different. This little shadow box idea can be adapted for many occasions. The one I made was to celebrate the birth of a baby.
   I got the box frame from the $2 shop. It was almost 2 inches deep so I was able to fit several things in. The first step was to choose a suitable paper for the back wall. I took this stylised flower idea a step further by painting dotted flowers around the outside of the frame.
 The shawl didn't take long to knit using up scraps of a fine wool. I made the little book by pasting a cover on to a square of thin balsa wood. The duck is two yellow pompons glued together with a red felt triangle as a beak. The tiny windmill on a stick is just folded paper on a toothpick stained brown.
 The thing that took the longest time to make was the clown. In my 'stash' I have lots of pieces of felt in many colours, so I didn't have to look far to get all the bits I needed. Once I started punching out the circles of felt I got a bit carried away! I ended up with enough to make several clowns, so gave them to my friends for their dolls house nurseries.
   In my next post, I'll put the instructions for how to make the clown. 

Wednesday 21 September 2011

Tudor Dolls House: Making the Furniture in 1:12 Scale

1:12 scale Tudor bed
Miniature Tudor furniture
I don't have any power tools at home, doing most of my work using only a craft knife and a mitre box and razor saw. So if I can buy (or swap something for) good quality kitsets of wooden furniture, I jump at the chance. Most of the furniture in my Tudor dolls house is made from kitsets.  
   The pre-dieu stand and the bench were kitsets made for me by a friend at minis club from patterns I supplied. The impressive fourposter bed with the laser-cut carvings is one I made from a kitset supplied by another club member.
Tudor furniture
   From a dolls house supplier I bought the kitsets for the settle (actually sold as a church pew, I put the panelling on the back), the bread dough trough and the cradle. That originally had a covered hood piece but I didn't put that on as in Tudor times the cradles were open. The simple two-level shelving unit in the kitchen is one I cobbled together from two little tables.
   I did make three pieces of the 1:12 scale furniture in my Tudor dolls house from scratch. The bed in the top storey bedroom is a concoction of verandah posts, a polystyrene block base and assorted pieces of wood for the top and head board. I also made the kitchen table and the refectory table in the Hall. Thankfully it's covered with a tablecloth and lots of food as the finish is not the best!
   Although I don't enjoy the building part of making dolls houses, I do like making kitset furniture. My biggest problem is having enough patience to walk away and let the glue dry!

Saturday 17 September 2011

Edwardian Dolls House: the Gentleman's Study

A dolls house gentleman's study
I decided that in this room I would honour my Scottish heritage. To start with I reupholstered the chair in a red and green tartan fabric and stitched the rug in similar colours.
  Several things in the study are to do with my family's history. I inherited the Craig coat of arms and have it hanging in my real house. So I reduced it on a photocopier to 1:12 scale and hung it on the wall above the miniature desk.
A photo album in 1:12 scale
   Before he died, my grandfather gave me the family photo albums. Dating from 1886, they are heavy, covered in embossed leather and closed with a brass clasp. Inside, the photographs are framed by watercolour painted scenes and floral designs. I miniaturised some of the photos, framed them with a pale-coloured wrapping paper, and stuck them into a tiny photo book. Now I have a little album of my ancestors!
   There are other special things in this study. My daughter made the Tiffany lamp out of Fimo and my husband made the brass telescope. You can actually look through it! The globe is a pencil sharpener; the bookcase contains real, readable books; the model ship represents my family's shipping interests in the nineteenth century. And yes, the decanter on the side table really does contain red wine! 
  

Wednesday 14 September 2011

Retro Caravan: Experimenting With the Exterior

Photo from Life and Leisure magazine
I saw this photo in a Life and Leisure magazine, liked the colour scheme and decided I'd make my caravan look like that. First thing was to spraypaint the inside and outside in white. Then I dithered over whether to paint the bottom part of the exterior red or try something else.
   I was wandering round Mitre 10 and saw a roll of red contact paper, the type, with a paper backing that peels off, that you stick on kitchen shelves. That was an 'aha' moment!
Starting the exterior of the miniature caravan
   At miniatures club on Sunday, I cut the contact paper to size and stuck it on, taking care to get the air bubbles out. It looked OK, but after a while, the paper started to lift up. So I peeled it all off, put a layer of tacky glue over the wood and repositioned the paper. It slipped around a bit then - I'd get one side lined up but by the time I'd smoothed it on, it would have slid out of position.
   However, I persevered and let it dry. I found some metal strips that I thought I'd do the edges with but they were too hard to bend and stick down on the curved parts. So I'm going to try this white braid up the sides and around the wheel arch.
   I'm still in experimental mode on this. By the time I go to minis club next month I might have ripped it all off and started again!
  

Monday 12 September 2011

How to Make a Rag Rug in 1:12 Scale

 A rag rug in 1:12 scale
You know those old-fashioned rugs, where housewives cut up strips of worn materials and hooked them through a sacking or hessian backing to make rag rugs. It was a way of getting a bit more use out of an old dress or shirt or curtain. Recycling before it became trendy.
  You can make those rag rugs too for your dolls house. They are perfect for a cottage or the service areas or children's rooms of a Victorian or Edwardian house.
  But you won't be using materials. You'll use bunka, the fine cord that comes in a myriad of colours and unravels when you pick at one end. The curly, loopy texture you get looks like a 1:12 scale version of the loops of the 'real size' hooked rugs. Remember - making minis is a bit like magic - it's all in the illusion!
   You will need:
  • a piece of backing material such as calico, linen or felt
  • bunka in your choice of colours
  • tacky glue
  • scissors
  • waxed paper
  • something heavy e.g. a tin of baked beans
I wanted a colourful rug to put in front of the cooker in my Edwardian dolls house kitchen, so I chose bunka in a variety of strong colours. My rug is a simple pattern of stripes. You might like to make a border and fill in the middle with a design. Use your imagination.
  1. Cut the piece of backing material the size you want your rug to be.
  2. To make a striped rug like mine, cut lengths of bunka twice as wide as your backing.
  3. Gently tease one end of the bunka lengths and unravel them. You want them to retain a tight but loopy texture so don't pull or stretch them too hard.
  4. Cover the backing fabric with tacky glue.
  5. Gently but firmly press the bunka onto the fabric in the design of your choosing. Don't leave any gaps.
  6. Put a piece of waxed paper on a firm surface and lay the rug on top.
  7. Cover with another piece of waxed paper and put the weight on it.
  8. Leave to dry.
  9. When thoroughly dry, trim the bunka flush with the backing fabric.
Once you've made one of these little rugs, you'll probably want to make another, and another. They are so easy and look so realistic.

Saturday 10 September 2011

Getting the Scale Right for Dolls House Measurements

Fimo 1:12 scale vegetables
I think the hardest thing about making miniatures, especially when you are starting out in the hobby, is getting the scale right. Figuring out just exactly what 1:12 or 1:48 or half scale or 'dolls house for a dolls house' scale really mean.
  I remember when I made my first Fimo cauliflowers for my 1:12 scale kitchen. I spent ages getting the Fimo the right blend of greens, and thin enough for the leaves, and arranging them into a realistic shape. I thought it was a pretty passable effort, until I put the cauliflower on the dolls house bench. It was enormous! Not in the right scale at all.
  Then I overcompensated and made things too small. But after a while I got my 'eye' in and could judge the right sizes.
   One thing I have found very useful is to keep a 6 inch ruler in my handbag. Then when I'm out and about and find a miniature treasure, I can instantly measure it to see if it's in the suitable scale for my project.
   

Friday 9 September 2011

My First Dolls House

The Greenleaf Canterbury Dolls House
Before I knew anything about scale measurements, before I knew anything about working with wood, before I knew anything about miniatures in general - I built this dolls house.
   I was a total newbie to the hobby. One day I'd been at a friend's 60th birthday party and some of us were talking about how we had never had a dolls house when we were children. A week later I was walking past a hobby shop and saw the kitset for this one in the window. Five minutes later it was mine!
   It was a Greenleaf 'Canterbury' model. I liked the quaintness of the design. It took me many hours to sand the plywood, paper the walls and slot and glue them all together. I used a hot glue gun, not knowing that was 'frowned' on in miniatures circles.
  Finally the day came when my little blue house was standing, all wallpapered and painted, ready to be furnished. I even made a tiny birdhouse to match. I was so excited! I bought some furniture for the living room. It didn't fit. The house was smaller than 1:12 scale!
   So began my foray into improvising minis, making minis, adapting minis, and learning about dolls house scales. I'll write more about that in my next post.

Sunday 4 September 2011

Retro Caravan: the Beginning

1:12 scale kitset for caravan
Do you remember those little round caravans popular in the 1950s and 60s? Starliners, they were called. My husband, daughter and I went round the South Island in one when she was a toddler. The caravan looked cute and was very light to tow, so light in fact, that in strong winds it lifted off the ground. That was alarming!
   At our miniatures club, we are making 1:12 scale versions of them.
  So far at club, one of our members has created the kitsets from a design by Gayle. Bending the wood to make the rounded sides would have been a problem for those of us without special tools and machinery, so Laurie made the basic shell of the caravans up. 
The retro miniature caravan shell
   I'll take you on the journey with me - from pieces of wood to a completed caravan. Each month at our club meeting I'll do a bit more and post it on my blog so you can see it develop.
   So far I've (with help - I hate power tools) cut out the door, windows and wheel openings, and under-coated the body with acrylic paint.

Friday 2 September 2011

How to Make a Braided Rug for Your Dolls House

A 1:12 scale braided rug
If you can plait your hair and have ten minutes to spare, then you can make a braided rug for your dollshouse. That's how quick and easy it is!
   You will need:
  • embroidery cotton
  • tacky glue
  • piece of felt
  • scissors
  • waxed paper
  • something heavy e.g. a tin of baked beans!
I used an embroidery cotton that had variegated shades of blue in it. It sits in the bathroom of my Edwardian dolls house, beside the bath. You can choose a piece of felt for the rug's backing in a colour to tone in with the thread.
  1. Separate the embroidery cotton into lengths, each piece of three strands. Cut three lengths 18 inches long.
  2. Knot the three lengths together at one end and start plaiting.
  3. Cut a circular piece of felt the size you want the finished rug to be.
  4. Cover one side of the felt in tacky glue.
  5. Starting from the centre, coil the plaited thread around and around, pressing it into the glue as you go making sure there are no gaps.
  6. If the plait is too long, cut the end off, dip it in tacky glue to keep the strands together, and tuck it in to make a neat finish at the rug's edge.
  7. Place the rug on a piece of waxed paper on a flat surface, cover it with another piece of waxed paper and put something heavy on top. This prevents the rug from curling up.
  8. Leave to dry.
There - in the time it took for me to write this, I could have made a rug!